Friday 28 December 2012

And the winner is...


Congratulations Afayah!!! and can you please email us your mailing details at exotic.hair123@gmail.com

We would also like to thank all our lovely followers who entered the giveaway and gave us some really helpful advice. We appreciate ALL our followers and we look forward to growing and improving our blog for the coming year. Thank you all!!!!

*The blogaversary giveaway drawing was done using random.org

Saturday 22 December 2012

Beaded Friendship Bracelet

Hello guys this is my final installment to the Blogmas gift series and it's all about the Friendship Bracelets; I opted to use beads instead of the typical embroidery thread and it was pretty simple to construct, so let's get started guys!!

Here's what you'll need:


Beads of your choice (I'm making a 5 bracelet set)
Stretch Cord (0.5mm thick)
Charms (optional)
Scissors 
Super glue 
Bowl 
Jump Rings (pictured below)

STEP 1: Take your beads apart and place in the bowl for easy access. To begin I cut off two 12 inch pieces of the stretch cord, I do however recommend that you purchase the 1mm thick stretch cord so you don't have to double it up as I did and then simply start threading the beads onto the doubled cord.


STEP 2: Once you've threaded the beads as how you want them, ensure that the bracelet fits comfortably around your wrist by doing a 'fit' as I call it. In the bracelet below I also added two diamante beads.


STEP 3: Once it fits correctly, then you can begin to knot the loose ends; make sure to pull VERY tightly on the knot so that it does not slip out of place. Continue to make about 3 more VERY tight knots to secure the bracelet.


STEP 4: Once the bracelet is tightened properly the knots should not come undone, then cut off the excess cord as close to the knot as possible.


STEP 5: To make sure that in the future the bracelet doesn't fall apart add some super glue to the knot to secure it. I used my glue gun, but super glue is better.


STEP 6: If you opted to add charms to your bracelet complete the above steps, then take your jump rings to attach them to bracelet so that they dangle when you put them on. See how they look below.


STEP 6: You're done!!!!! See it wasn't that hard! Once you've completed the set of bracelets and properly secured them, wrap them up in a gift box for your friend, I'm sure she'll love them.


I hope you enjoyed my short gift series and if you have any questions, be sure to leave a comment below. Take care guys and Happy Holidays!!!
Debbie

ALL MATERIALS WERE PURCHASED AT MICHAEL'S CRAFT STORE OR YOU CAN ORDER THEM OFF OF MICHAELS.COM.

Friday 21 December 2012

Mason Jar Gift Set

Hi guys here's another simple and easy DIY gift idea. The mason jar replaces the commonplace gift bags that we see around Christmas time and I promise you that this will be so simple to recreate so here's what you'll need:


Some ideas of goodies that you can put into your mason jar from makeup, nail polish to jewelry the choice is yours.


Other things that you'll need:

Glue Gun
Glue Sticks
Mosaic Glass Pieces (optional), you could use beads or sequins
Mason Jar or any cleaned jar that you have around the house
Gift Tissue Paper
Ribbon

How To:

STEP 1: Start off by preparing your work surface by spreading newspaper to protect the glue from getting on anything. We will begin by decorating our mason jar so get your glue gun heated up and  take out the mosaic glass pieces or whatever you'll be using to decorate your jar.


STEP 2: Start gluing the glass pieces unto the mason jar, being careful when using the hot glue gun because the glue will burn you; also make sure you have a design in your head of how you want to place the glass pieces on the jar before starting.


STEP 3: When you have completed decorating your mason jar you can start stuffing it with the gift tissue paper and placing your goodies in the jar.You can opt to completely or partially fill the jar with the tissue paper.


STEP 4: Now its time to make the bow for the jar. Take your ribbon of choice, it's good to have a ribbon that is not too wide, the width of mine is 1.5cm. Using your handy dandy glue gun glue a piece of ribbon around the rim of the cover of the jar, then construct the bow separately then glue it onto the rim as well.


STEP 5: And you're done!!! Now you can give your friend or family member something that they can even continue to use as a storage jar or decorative piece to their vanity!


Hope you enjoyed guys, and stay tuned for my next DIY gift idea
Debbie.

Thursday 20 December 2012

Homeade Body Butter Souffle

Hey guys! Today's Christmas DIY gift is also a skincare post. I've previously mentioned that I love making my own body creams/butter because I have really dry skin, this is also great for persons who have eczema as well. This is a great gift and I'll show you how you can make your own at home. You are more than welcome to make the recipe your own by using whatever ingredients you have it  will work out just as great! so let's jump into it.

Here's what you'll need:


Utensils

Saucepan                                                               Tablespoon
Metal mixing bowl                                                Wooden popsicle stick
Hand mixer                                                            Container to place body souffle


 Ingredients

Carrier Oils                                                                  Butters
Vitamin E Oil                                                                Shea Butter
Coconut Oil                                                                  Cocoa Butter
Extra Virgin Olive Oil                                                    Raw Mango Butter
Jojoba Oil                                                                     Olive Butter
Monoi de Tahiti Oil                                                       Illipe Butter
Castor Oil                                                                     Kokum Butter
Apricot Oil

Essential Oils
Lavender
Jasmine

How to

1. I will be using the double boiler method to melt my butters, but you can also opt to melt the butters in the microwave. To begin, add water to the saucepan and place on a low heat until the water begins to steam. The metal mixing bowl can now be placed on top of the saucepan in order to make the double boiler.


2.  You can begin adding your butters to the double boiler at this time by using the tablespoon. For harder butters such as the cocoa butter you might need to use a knife to break it into small chunks. I do not use exact measurements, I simply add the ingredients to my liking.


3. You must keep an eye on the butters while they are melting, AT NO TIME should the water in the saucepan or the butters come to a boil, if this happens turn off the heat and allow the butters to slowly melt on their own.


4. When everything has liquefied, remove the metal mixing bowl from the saucepan and place aside to cool. You can now stir the liquid with the wooden popsicle stick to ensure that all the butters are well combined.


5. After 15-20 minutes, the mixture should have cooled considerably and you can begin adding your carrier oils. Ensure that the liquefied butters and oils are mixed well by using the popsicle stick once again.


6. Place the mixture into the freezer. 


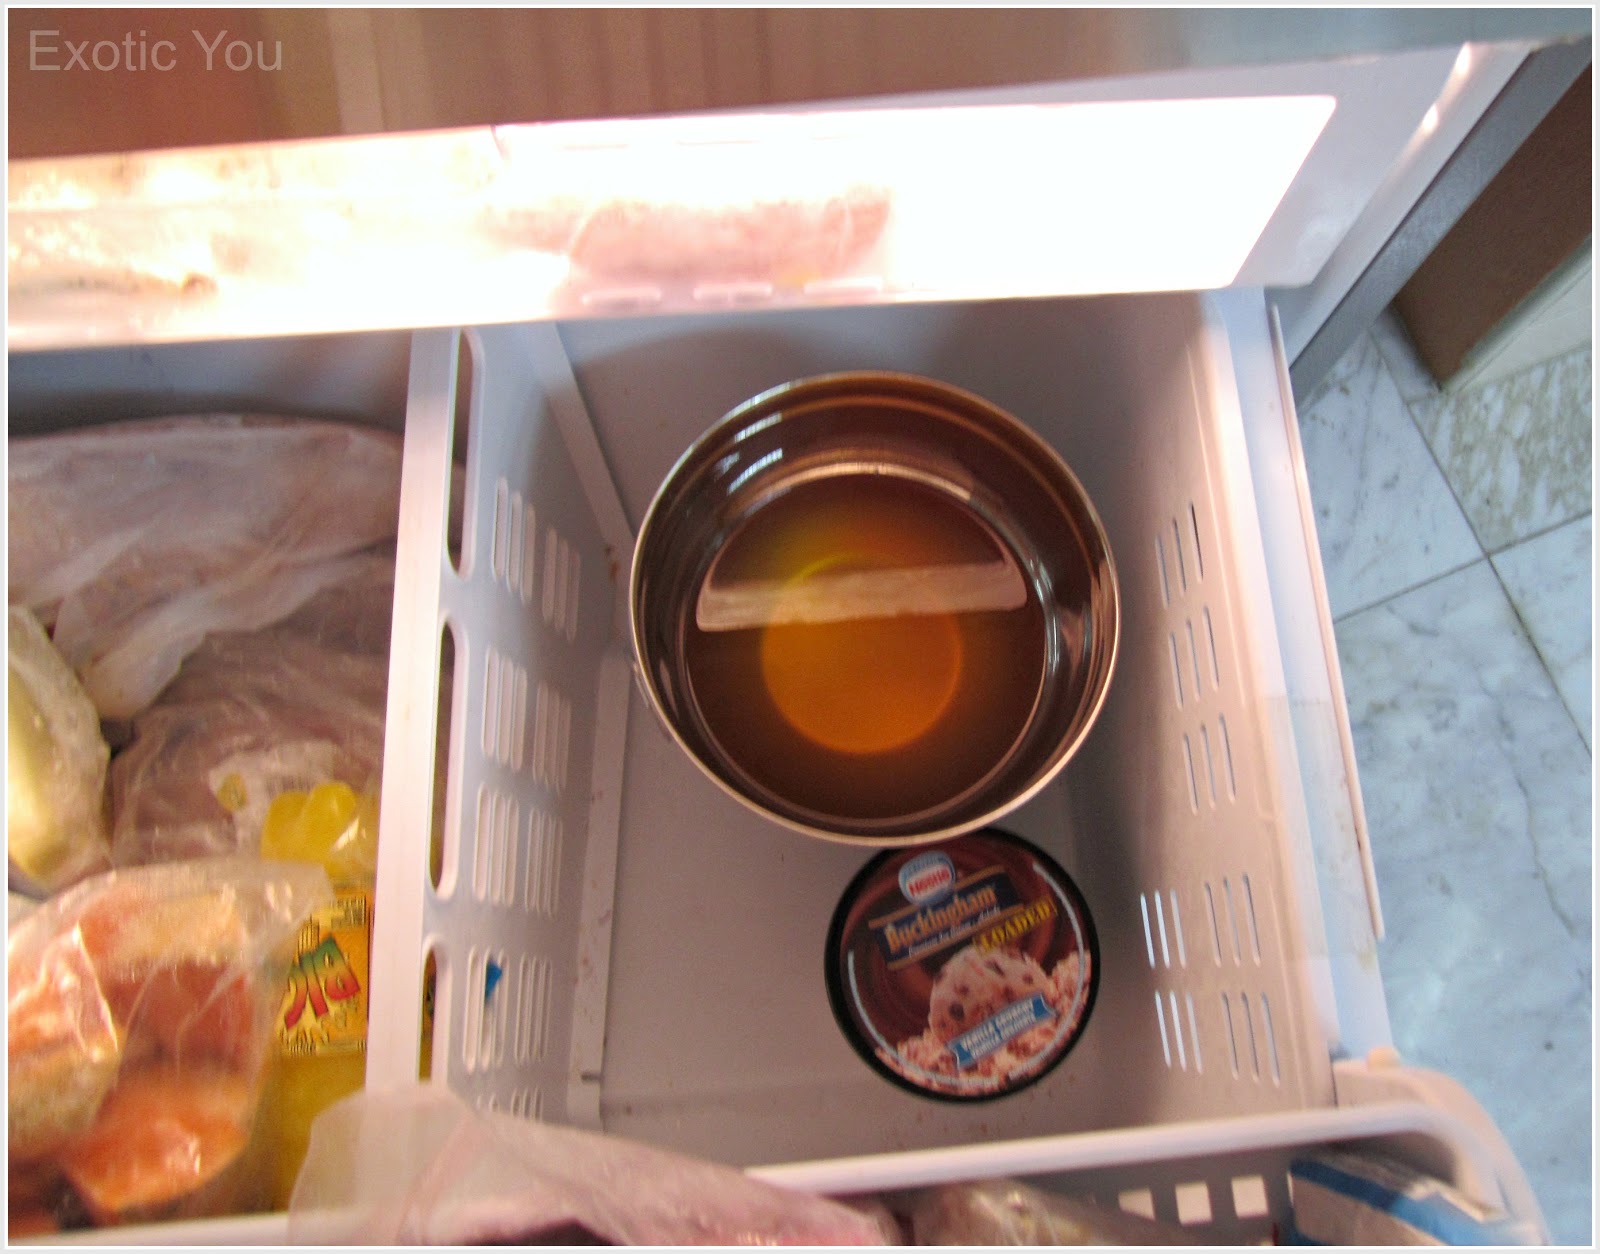
7. After another 15 minutes, remove the mixing bowl from the freezer. The mixture SHOULD NOT BE FROZEN,  it may have hardened a little around the edges but in the center should still be in a liquid state. At this point the mixture should also have an opaque appearance. Use the popsicle stick to stir the mixture once again, it should look similar to the image below.


9. Add your essential oils to the opaque liquid; once again I do not use exact measurements, I just add to my liking. Once you begin stiring the essential oils into the mixture it will begin to slowly firm up as you can see in the image below. Essential oils should never be added to anything to too warm/hot as they will evaporate and you will loose their benefits.


10. 'WHIP & REST': Now begin whipping the mixture with the hand mixer on a low setting. For me this is the most important step because the longer you whip the mixture the softer it will become and maintain that softness afterwards. After whipping the mixture for 10 minutes, leave it to rest for another 12 minutes.This is the 'whip and rest' step as I like to call it and it takes me about an hour and a half of whipping and resting to get it to the souffle consistency that I like. At every whipping interval I also like to increase the speed of the hand mixer.


N.B. At first the mixture will have the consistency of cake batter, then it eventually thickens to a marshmallow frosting consistency after the 'whip and rest' step is completed you can see how it gradually thickens in the pictures below.


11. Now after all that hard work you're done!! just use the tablespoon that we had earlier to spoon the mixture into container. After several hours the mixture would have solidified into to a light souffle texture. I use this as my everyday moisturizer and it isn't too oily as the Kokum butter helps the body butter souffle to absorb quickly into the skin


To spruce this up for Christmas add a bow or ribbon to your jar. Also remember to research your ingredients before using them.
Debbie

Wednesday 19 December 2012

Cutesy Button Earrings

Hello again guys! Today's DIY gift will be making these cute button earrings that you see below. Check out the video on how you can do this yourself and always remember to have fun!


Tuesday 18 December 2012

DIY Christmas Gifts!


Hey friends, we were recently tagged by fellow blogger Rane over by Haute People to participate in the Blogmas fun for 2012 so I wanted to do something fun, festive and also benevolent, so what better way than to introduce you guys to another short series on the blog which is dedicated to the whole spirit of gift giving. Now, if you're unsure of what to gift your female friends or family members this Christmas these quick and SUPER easy DIY projects will hopefully help you out, so from December 19 - 22 I will be doing 4 DIY projects just in time for Christmas.

Stay tuned for the Christmas series guys!
Debbie

Monday 17 December 2012

Cropped Meets Midi OOTD

Hey guys! I have another outfit post for you today. The post is entitled cropped meets midi and this basically sums up the outfit. I paired a striped navy and white midi length skirt with a blue cropped top and my Shoedazzle heels.


Top: Cotton On
Midi Skirt: Cotton On
Necklace: MOD 36
Shoes: Shoedazzle

Photographer: Sanai

Hope you enjoyed!
Debbie

Saturday 15 December 2012

M.A.C Store Opens Today!!! - Initial Review

Today was the first official day of operation for the highly anticipated M.A.C store that opened at Sovereign Centre in Kingston. I got the chance to pop in for a little bit so I could do a quick review for our lovely Jamaican followers. First, let me establish that I am basically comparing our (Jamaica) M.A.C store to others that I have been to. I have been to M.A.C stores in Hong Kong, Singapore, Istanbul, N.Y. and Miami. Also, I want to apologize for the limited photos because I had to use my phone outside of the store because they don't allow persons to take photos.


Store
First let me start off my discussing the store itself. The store is pretty big as I was expecting a much smaller store since the Jamaican market is not that large. So the size of the store is quite impressive. You can walk around and shop with enough space to breathe. The layout is very typical of a M.A.C store and the organization of the products is pretty much the same. There is also a little private room sectioned off, which I am not sure what that is all about. They also have most of the permanent collection/products that you would find in any M.A.C store. Also in stock is the current "Glamour Daze" collection. All in all, I am happy with the store itself.


Staff
Le sigh. Where do I begin? First let me express that I am giving them some leeway since its officially the first day of service and they were probably overwhelmed. The staff was dressed in all black of course, which is typical for M.A.C, however, their make-up was very underwhelming. Normally when I enter a M.A.C store I am fascinated by the makeup that the staff is wearing. Tonight, all I wanted to do was to take some makeup remover wipes and wipe off their faces. One or two girls got it right but overall I was very disappointed. As for customer service, it was horrible! Jamaica is known for bad customer service but I was hoping this store would be an exception. I had to ask four,  yes four persons before anyone would really pay me any attention, even when they were not doing anything. One girl was actually really rude. However, finally a MAC MUA (makeup artist) by the name of Nyoka came to my rescue. Also, I realized that they don't have much knowledge about the products which is pretty scary if you asked me. They are also VERY slow! However, on a brighter note, I did see some MAC MUAs testing products on some customers so if you need to find your shade in a foundation, they might be helpful.


Pricing
The Jamaican M.A.C store is also the first M.A.C store that I have been to where the price isn't displayed by the products. If you need to get the price of an item you have to go and find a MUA to get the product for you, then you have to take the product to the cashier, wait in line, then have them ring it up...talk about annoying!!! So, of course I was not able to get the price for a lot of products. The MUA also did not know the price of the items, so it made no sense asking them. I got the price of the M.A.C Matchmaster foundation to use as a comparison. In Jamaica is retails at approximately $4200 JM ($46 USD) after tax. On the M.A.C website this foundation retails for $33 USD. With that, you can do the math. This is not surprising though because things are usually more expensive in Jamaica.

Happy Shopping!!!
Shannon

Get Organized!!

I decided to take charge of my clutter and mayhem once and for all and get my jewelry and clothing items organized so I wouldn't have to spend so much time rummaging through my things to find whatever it is I was looking for so here's what I did:

I purchased these kitchen/food displays at Exotic Stone Creations while they were on sale as cute vanity organizers even though they were meant for apples, bananas and nuts :) The first adjustable display works perfectly for my bangles and arm candy; it's functional, practical and everything is in plain sight and untangled just the way it should be. The second display has four compartments and is perfect for smaller everyday pieces such as my rings, small necklaces and watches.

Vanity display #1


Here are the many different ways you can adjust it

Vanity display #2


As for my closet, it is still a work in progress but I'm glad at the present outcome because it was previously a dungeon of clutter, but after purchasing a shelving/closet unit from True Value Hardware everything is much better, but I still intend to improve upon it


Here's the storage unit that I purchased, normally it's very pricey, but I got this one at a steal about 50% off because I guess it was returned to the store, but it worked out great for me!


Semi organized closet


Always remember to colour coordinate your closet as well, check out Shannon's previous post here on how to do so.

Do you have any suggestions on any great storage ideas for handbags, necklaces, shoes and so on? Well I'd love to hear them.
See ya next time friends!
Debbie

Thursday 13 December 2012

DIY: Renewing your Bridget Sandals

We all have grown to love our Bridget Sandals. They are really good quality sandals that we probably will have for years, however, even though its made of high quality leather, they are still susceptible to colour fading. But rest assured that you don't have to throw your sandals out or retire them. Bridget Sandals does offer a repainting and repairing service at a charge; however, there is a cheaper way to renew your sandals and it's by doing it yourself! 

It's easy to repaint your faded Bridget sandals or you can change the colour of your sandals to another colour. The acrylic paint I used can be purchased at Liguanea Drug and Garden Centre at 134 Old Hope Road, Kingston 6. The 'Pebeo' High Viscosity Studio paints cost approximately JM$400. You do get a lot of product for the price, and with that you can paint your sandals as many times as you like.


You will need gloves to protect your hands when painting and also a small paint brush for the actual painting.


 These are the results of two Cutaways that I repainted...


I hope this helps,
Shannon xoxo
Related Posts Plugin for WordPress, Blogger...